Now that all of our basic setup is done, we get to move on to the fun stuff: adding content into the game. We’ll start with a very basic item.
Begin by creating a new package: cubicoder.tutorialmod.init. Next, create a class named ModItems in the cubicoder.tutorialmod.init package. This class stores references to all of our items in case we need to access them in the code. By using the @ObjectHolder annotation, we can have Forge automatically inject our items into the class by pulling them out of the registry.
package cubicoder.tutorialmod.init;

import cubicoder.tutorialmod.TutorialMod;
import net.minecraft.item.Item;
import net.minecraftforge.fml.common.registry.GameRegistry.ObjectHolder;

@ObjectHolder(TutorialMod.MODID)
public class ModItems {

	public static final Item FIRST_ITEM = null;

}
The mod id in the @ObjectHolder parameter simply tells Forge to inject matching items from our mod; putting "minecraft" would make it look for items from vanilla Minecraft. If we don’t specify an @ObjectHolder annotation above the field declaration, it will take the name of the field, set it to lowercase, and use that as the registry name to be injecting from. So, in this case, we need to make sure the name of the field is FIRST_ITEM, since the mod id is automatically added. If you’re curious or confused, read more on @ObjectHolder here.
Next, we need to actually register our items. Create a class in cubicoder.tutorialmod called RegistrationHandler.
package cubicoder.tutorialmod;

import net.minecraft.creativetab.CreativeTabs;
import net.minecraft.item.Item;
import net.minecraftforge.event.RegistryEvent.Register;
import net.minecraftforge.fml.common.Mod.EventBusSubscriber;
import net.minecraftforge.fml.common.eventhandler.SubscribeEvent;

@EventBusSubscriber(modid = TutorialMod.MODID)
public class RegistrationHandler {

	@SubscribeEvent
	public static void registerItems(Register<Item> event) {
		final Item[] items = {
				new Item().setRegistryName(TutorialMod.MODID, "first_item").setTranslationKey(TutorialMod.MODID + "." + "first_item").setCreativeTab(CreativeTabs.MISC)
		};

		event.getRegistry().registerAll(items);
	}

}
Registration has changed in 1.12.2 from older versions of Minecraft Forge. Instead of calling GameRegistry.register(), there is now an event for each kind of registry. We subscribe to the event bus using @EventBusSubscriber, then provide a method for each event using @SubscribeEvent. In this method, we initialize our item while adding it to an array of items. Then, we use the event.getRegistry().registerAll() method to register every item in our item array. We also add the item to the Miscellaneous creative tab for easy access. Later, we’ll learn how to add our own creative tab.
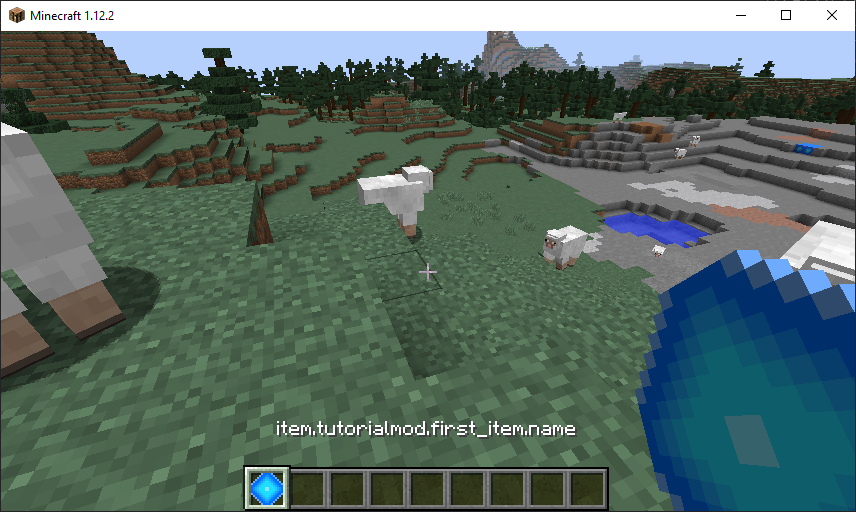
The translation key, like “pickaxeDiamond”, is used in language files and will translate into the name that appears onscreen, such as “Diamond Pickaxe” for English. The translation key and the registry name of an item should always be the same for mods, even though vanilla doesn’t do it this way. We will be covering language files in a later tutorial.
The registry name is the name under which the item is registered into the Forge Registry. This is the name that would appear in a /give command, such as /give @s minecraft:diamond_pickaxe. (Obviously, it’s used for many other things as well.) For more information on the Forge Registry, read the official documentation on it.
The mod id is added to the translation key to protect against namespace collisions. For example, two different mods might both add a copper ingot and set its translation key to copper_ingot. Without adding the mod id, the different items appear to be one. The mod id is also added to the registry name in the setRegistryName() method.
One easy way to create and name Items all in one go is to create a utility method. This method would take in the Item and a String, and it would return the Item after setting its registry name and translation key to the inputted String. See if you can figure this out on your own, but if you need help, check the source on GitHub.
I’ve done this for my project in a class called RegistryUtil, located in cubicoder.tutorialmod.util. I’ll be using this for the remaining tutorials, like so:
//...

final Item[] items = {
		RegistryUtil.setItemName(new Item(), "first_item").setCreativeTab(CreativeTabs.MISC)
};

//...
We could run the game now and have a working item, but it would have the ugly default pink-and-black checkboard texture. Instead, we will add a model to the item.
Create a new class called ModelRegistrationHandler in the cubicoder.tutorialmod.client package.
package cubicoder.tutorialmod.client;

import cubicoder.tutorialmod.TutorialMod;
import cubicoder.tutorialmod.init.ModItems;
import net.minecraft.client.renderer.block.model.ModelResourceLocation;
import net.minecraft.item.Item;
import net.minecraftforge.client.event.ModelRegistryEvent;
import net.minecraftforge.client.model.ModelLoader;
import net.minecraftforge.fml.common.Mod.EventBusSubscriber;
import net.minecraftforge.fml.common.eventhandler.SubscribeEvent;
import net.minecraftforge.fml.relauncher.Side;

@EventBusSubscriber(value = Side.CLIENT, modid = TutorialMod.MODID)
public class ModelRegistrationHandler {

	@SubscribeEvent
	public static void registerModels(ModelRegistryEvent event) {
		registerModel(ModItems.FIRST_ITEM, 0);
	}

	private static void registerModel(Item item, int meta) {
		ModelLoader.setCustomModelResourceLocation(item, meta,
				new ModelResourceLocation(item.getRegistryName(), "inventory"));
	}

}
This subscribes to the ModelRegistryEvent and tells the Forge model loader to look for the item model in a certain directory. Note that the value = Side.CLIENT parameter in the @EventBusSubscriber annotation ensures that this only happens on the client side. This is because only the client side needs to know about model information. The Forge official documentation has a great resource about the difference between client and server in modding.
In our case, the model directory will be assets/tutorialmod/models/item. This folder goes in the src/main/resources folder. Also, in the same place, create the assets/tutorialmod/textures/items folder. This is where all our item textures will be stored. Note the spelling of these directories: models/item with no s after item, and textures/items with an s.
Models in Minecraft are done using JSON files. Create an untitled text file in assets/tutorialmod/models/item and name it first_item.json.
{
    "parent": "item/generated",
    "textures": {
        "layer0": "tutorialmod:items/first_item"
    }
}
The parent line tells what model this model should be based off of. For this example, this model will inherit all of the features of the item/generated model that Minecraft provides. The textures block tells Forge where it should look for the texture.
Your item’s texture, called first_item.png, goes in the assets/tutorialmod/textures/items folder. This should be a square texture, with dimensions of powers of two (8x, 16x, 32x, 64x, 128x, etc.). I recommend sticking with Minecraft’s default of 16x16 (here’s why).
Run the game to see your custom item in the Miscellaneous creative tab!
Important Links for Items